 |
 |
|||||||
|
|
Wood Frame Cage PlansOur plans were designed for a cage 6’ tall, 5’ wide, and 3’ deep. Because we ended up cutting the interior crossbeams to 5’ and 3’ exactly, we ended up with actual dimensions of 6’ tall, 5’4” wide, and 3’4” deep when we took into account the depth of the uprights. But hey, bigger is always better with igs, and if you want to stick to nice even feet when you build, just remember to account for those extra inches in the uprights! The cage was designed to be modular so we could easily break it down and move it. Not to mention there was NO WAY we would be able to fit a cage of those dimensions up my stairway and through the Dragon Room door! All 4 sides are made as panels, connected with metal corner braces that unscrew for easy disassembly and reassembly. We used various metal bracers on the uprights and crossbeams – probably a lot more than we really needed for stability, but I know this cage will NEVER fall apart on me! You can probably get away with using a lot less metal bracers than we did and still have a sturdy cage. Because my hubby’s one request regarding the cage was that it ‘look nice’, I decided to stain the wooden frame before coating with polyurethane. I used a light stain, and then put 2 coats of poly on the exterior and 3 coats on the interior. If you don’t like the look of stained wood, you can also paint with a latex based paint. Just be sure that no matter how you decide to finish the cage, you let it dry completely until all fumes are gone. Remember that high temps can also release more fumes, so you should probably run the cage empty for a day with the heat lamps on it to make sure all fumes are gone. It's important to keep in mind that this cage was designed for a dedicated reptile room that had a constant warm ambient and high humidity. Because of this, having the open mesh sides was ok. If you are planning to have this as an 'only' cage, it is best to enclose the cage to keep in heat and humidity. Plywood, plexiglass, or even cheap shower curtains can be used to modify this cage for use in a normal household setting. Building this cage was exhausting but fun. Without nice, pre-made plans (like these!) we kept changing our original plans and making modifications on the fly. I lost track of how many trips we made to the Home Depot (they love us there!) either for more parts or to exchange a part for something we thought would work better. This cage cost around $300 to build, but could be made for a lot cheaper. We did a lot of learning as we went along! A final tip before starting the actual plans – measure measure measure! ;) They always say ‘measure twice, cut once’: believe it! *grin* And now, the PLANS! (Step by step photos of construction can be found here.) Parts List: Eight 6’ 2x4s (for uprights) Six 5’ 2x4s (for back and front crossbeams) Six 3’ 2x4s (for side crossbeams) One 5’8” 2x4 (front wall middle upright) One 31” 2x4 (front wall crossbeam) Two 8x4 Sheets of Showerboard (for back wall) Two 5’ 1x3s (for door uprights) Three 26” 1x3s (for door crossbeams) One 5’x3’ sheet of ¾” plywood (for floor) Two 5’ 1x3s for floor supports on back and front Three 3’ 1x3s for floor supports on sides and middle One 5’x3’ sheet of heavy duty plastic to go under the floor Two Rolls of 3’x15’ black plastic garden mesh (for sides) Two Rolls of metal hardware cloth (for ceiling) Nine Angle Plates (for corner uprights) Thirty Rigid Tie Angle fasteners Twenty-Four Mending Plates Three or Four boxes of Strong Drive low profile screws One Box construction staples Two brass hinges Two brass bolt locks One brass door handle Five caster wheels One can Stain (I used Puritan Pine) Two cans Hi-Gloss Water Based Polyurethane Two Paintbrushes (one for stain one for poly) Tackrag (to clean frame before finishing) Paper Towels (for wiping down after staining) Rubber Gloves (because I am MESSY!) One Double Edged finishing strip (to fasten the 2 showerboard edges together) Two Single Edge finishing strips (to finish off the showerboard edges) Several 3” screws (for added stability when joining crossbeams to uprights) TOOLS: Chop Saw Rotary Saw Power Drill / Screwdriver Staple Gun Level Measuring Tape ASSEMBLY INSTRUCTIONS: Note: When we made the cage, we assembled all the corner uprights first, and then added the crossbeams to form the back, sides, and front. To make it a bit easier to explain, and to make it easier to show how the cage is modular in design, I’m going to walk through assembling each of the ‘panels’ one at a time. Back Wall
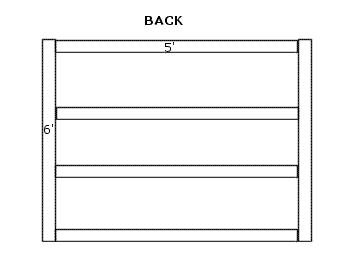
You will need two 6’ 2x4s, and four 5’ 2x4s for this piece. Attach two of the 5’ pieces (crossbeams) between the 6’ pieces (uprights) at the top and bottom to form a rectangle. Use the Rigid Tie Angle Brackets to attach the crossbeams to the uprights. Then attach the 2 other 5’ pieces at equidistant points between the top and bottom crossbeams. These interior crossbeams will be used to attach the showerboard for the back wall later. When you are done the back wall frame, it should look like this: Side Walls
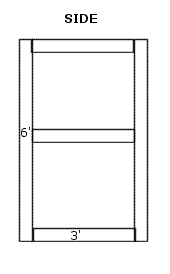
The side walls are assembled much the same way as the back wall. For each side, use two 6’ uprights, and three 3’ crossbeams – top, middle, bottom. Again, use the Rigid Tie Angle Brackets to attach the crossbeams to the uprights. Your two side panels should look like this: Front Wall The front wall is slightly different from the back and sides because it needs a doorway. The first step, however, is the same as for the other walls: use two 6’ uprights and two 5’ crossbeams to make your rectangular frame. Then, use your 5’8” upright and attach it to the top and bottom boards about 25 ½” from the right hand side upright. Once that center upright is attached, put your 31” crossbeam in between the left hand upright and your center upright. This creates the front wall and doorway: This completes the major framework for the cage. You can use the metal Angle Plates to attach the wall panels to each other – 3 braces per corner – top, bottom, and middle. At this point we tipped the cage over on its side and attached the casters to the bottom to allow us to roll it from place to place. Now we move on to the rest of the cage sections: door, floor, and roof! Floor Assembly The floor is fairly easy to complete. Once you have assembled your frame, measure your length and width, and cut your plywood down to size. It should be about 5’x3’, give or take a few inches. We attached 1x3s along the bottom edge of the walls to support the floor, and added a 1x3 brace across the center to give added support when walking on it. The plywood sheet gets at least 4 coats of polyurethane before being dropped into place. Because the floor was not a ‘tight’ fit, we stapled heavy duty plastic over the 1x3s along the bottom wall edges before dropping the floor in. That way any liquids or debris that falls through will be caught by the plastic and not my carpet. Door Assembly The door frame is very simple also. We used 1x3s again and created a rectangular frame to fit in the doorway just the way we created the sides of the main cage. The frame was stained and polyurethaned, and then the plastic netting was stapled over the frame. We then attached it to the front wall with the hinges, and added the door handle and latches. Roof Assembly Once the cage was completed and assembled in the room, we simply stretched the hardware cloth over the top of the cage and stapled it in place along the top edge of the walls. We had to use 2 pieces of hardware cloth to cover everything, and I used small bits of wire to ‘weave’ the 2 sheets together so that there can be no escaping through a gap in the ceiling. Finishing The Frame To finish the wooden frame and have it both ‘look nice’ and be able to stand up to humidity and iggy claws, I used a stain and a water based polyurethane. First, use the tackrag (or even a damp rag) to remove any dust and grime from the frame. Then apply the stain to the framework with a brush, doing a board or two at a time and wiping off the excess stain with paper towels before moving on to the other boards. Allow the stain to dry overnight. After the stain dries, apply several coats of polyurethane. I used 2 coats on the exterior and 3 coats on the interior. The floor got 4 coats. Just for fun, I used a lizard stencil and decorated the front of Mo's cage with little green lizards. :) Shelves and Ramps There are many different ways you can create basking and climbing areas for your ig. I used the plastic coated metal shelving often used for closets. I bought two 3' long 2' deep shelves for basking, three 6' long 2' deep shelves for ramps, and one corner shelf for basking. We used the included accessories to attach them to the walls and create the ramps and basking areas. I used some plastic cable ties to secure the ramps to the shelves. Other options would include wooden of PVC shelves and ramps, or large branches. |
|
||||||
© 2002 - PurpleDragon Website Design

