|
|
|
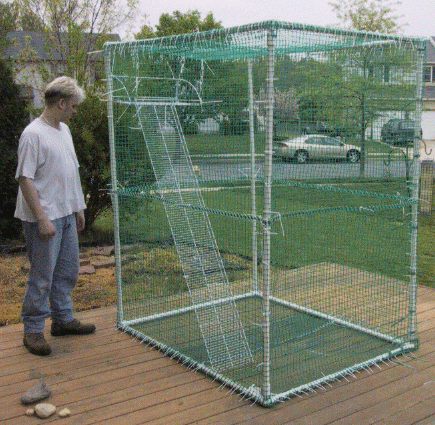
PVC Cage 3
PVC
Sun Cage
© 2002 Meredith Martin
Please
feel free to distribute these plans any which way providing © information
is included.
Parts
List
- 4
6 Long 1 diameter PVC pipes
- 4
4 Long 1 diameter PVC pipes
- 4
5 Long 1 diameter PVC pipes
- 8
Schedule 40 Outlet Elbow PVC connecters 1 x 1 x ½
- 8
Schedule 40 Male Adapters (PVC) ½ x ¾
- 8
Schedule 40 PVC 1 Couplings
- 3
40 x 25 green plastic Multi-Net garden fencing
- 1
6 x 12 plastic coated pantry shelving
- 1
24 plastic coated hanger shelf
- 1
1000 ct bag of plastic self-locking cable ties, 7 length
I used the white ones because they were a few $$ cheaper, but
was later told that the black ones hold up better in the sun and
weather outside, so next time I would probably spend the extra
$2 or so for the longer lasting ones!
- 2
6 count packages of Velcro cable ties (I would have bought more
since these weren't enough to really secure all the gaps in the
door area, but hubby got me extra from work. Id suggest at least
4 packages total.
- 1
ball Masons Twine (rot and mildew resistant!)
- A roll of
indoor-outdoor carpeting.
Assembly
- Assemble
the PVC corners screw the male adapters into the top arm of
the elbow connectors. Then connect the couplings to the top
of the male adapter. (This sounds confusing because it is! It
took me 3 trips to Home Depot to figure out all the parts I
needed to make it work. Basically youre making a 3-way connector
for the corners. The only 3-ways the Depot had were 1 connectors
on the 2 ends forming the V and the connector coming out the
top was a ½ female connector. So I had to buy a male adapter
to screw into the female end, but they only had ½ to ¾ adapters,
thus I ALSO needed to get the 1 couplings to bump the ¾ adapter
up to 1 so the pipes would fit in! If you can find 3-way connectors
that are 1 all the way around you wont have this hassle!)
- Assemble
the top and bottom frames: use the 5 and 4 pipes and your
3-way connectors to make the square frames.
- On
the bottom frame, attach the 6 upright pipes to the couplings
on the corner adapters.
- Have
a friend help you lift the top frame up and attach it to the
6 uprights. This completes the frame! You can use PVC cement
to permanently fuse the joints, or just leave them plain so
the cage can be disassembled.
- Next,
wrap the plastic garden mesh around the frame. Use the plastic
cable ties to attach it to the PVC frame. Start at the PVC pipe
on one side of the door end (I used one of the 5x4 sides as
a door area) and attach all the way around until you get back
to the door side. Leave the last end unattached so you can fold
it back and use as a door.
- The
garden mesh will only go up halfway on the sides, so you will
need to repeat the last step to cover all of the sides.
- Drape
the garden mesh over the top (you will need 2 pieces again)
and attach to the frame.
- Do
the same for the bottom.
- I
was a moron and went around connecting tons of cable ties to
each piece as I did it. That meant when I attached the top and
bottom pieces, I ended up doubling up cable ties along the top
and bottom edges of the frame. If Id thought it out, I would
have just attached each piece with 4 or 5 ties just to hold
it in place, and then went back and added all the extra cable
ties once I had all the mesh in place.
- For
the door section of mesh, I used cable ties about ¾ of the
way across the top and bottom, and left the last ¼ unattached.
For this section I used the Velcro cable ties so I can get in
and out and still have it secure.
- Because
you used 2 sheets of garden mesh on the cage, you will need
to sew the pieces together. Use the masons twine to weave
through the cells in the mesh and attach the sheets together.
Dont forget the top and bottom!
- Your
cage is now finished! Now all we need to do is add the basking
shelf and ramp.
- I
used cable ties to attach the hanger shelf up near the top and
side of the cage. I attached it both to the PVC pipes wherever
I could reach, and to the garden mesh. I looped several cable
ties together to make a chain so I could reach more of the
pipes.
- Then
I slotted the ends of the 6 shelf into the bottom of the hanger
shelf and used cable ties to attach it both to the hanger shelf
and the sides of the cage.
- I went
back after finishing the cage and added a 2 foot tall strip
of indoor-outdoor carpeting around the bottom edges of the walls.
Mo was rubbing her nose raw trying to get out at the bottom,
and the strip of carpeting prevents that, as well as providing
her some privacy and shade down at the bottom. I just poked
holes in the carpet and attached it to the mesh with cable ties.
- Presto,
were done!
If
I could do it over again:
Id
use the black cable ties
Id
attach all the mesh temporarily and then go back and make permanent
connections after it was all set up
Id
get some PVC T connectors and some extra pipes and add side braces
to the cage its pretty sturdy as it is, but if I had more bracers
I could add more logs and stuff!
It's
important to keep in mind that this cage is designed for either outdoor
sunning, or for a dedicated reptile room where it is easier to control
heat and humidity. If you are planning to have this as an indoor cage,
it is best to enclose the cage to keep in heat and humidity. Plywood,
plexiglass, or even cheap shower curtains can be used to modify this
cage for use in a normal household setting.
|
|